
In the previous tutorial we saw how you can drive the digital outputs of the Phidgets 1018
remotely, in this tutorial instead we will check the status of the digital inputs, which can be connected to magnetic contacts, push buttons, switches, etc. 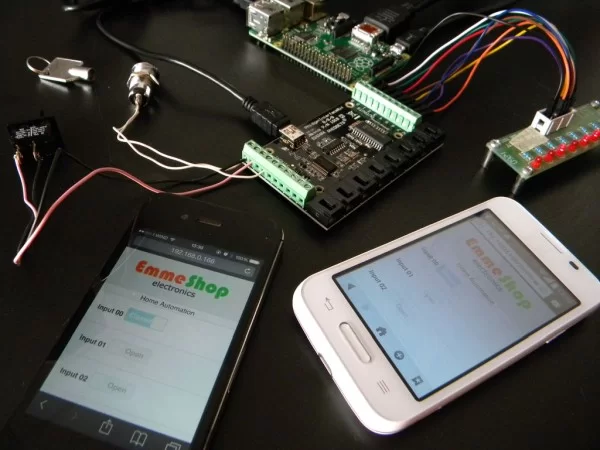
You need:
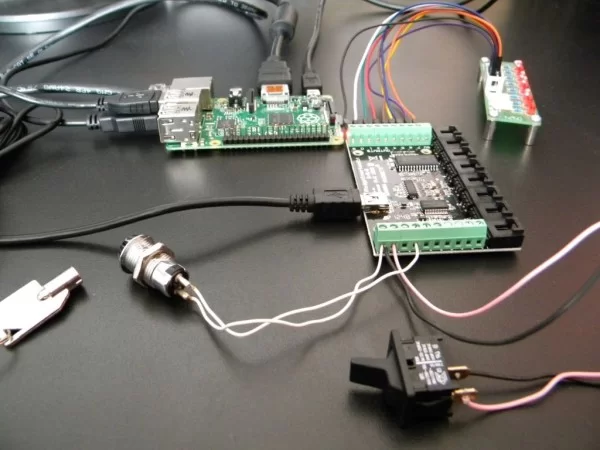
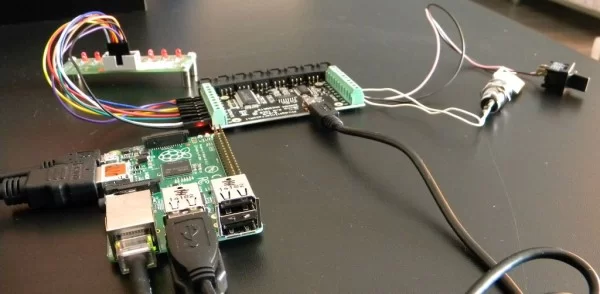
a Raspberry Pi B or B+, with installed Web Server and the Phidgets library or you can use our Raspberry Pi – SBC, MODEL B+, 512M MicroSD 8GB Phidgets ready
a 1018_2 – PhidgetInterfaceKit 8/8/8
some switch
Connect the 1018 to a USB port on Raspberry and the switch to digital input and ground.
Step 1: The Code
The code
Create a new folder that will contain all the files
sudo mkdir /home/pi/domo-emmeshop
Create a new file input.html
sudo nano /home/pi/domo-emmeshop/input.html
with this content
<!DOCTYPE html>
<html>
<head>
      <title>EmmeShop Domotics</title>
      <meta http-equiv="Content-Type" content="text/html; charset=UTF-8">
      <meta name="viewport" content="width=device-width, initial-scale=1, user-scalable=no">
      <link rel="stylesheet" href="http://code.jquery.com/mobile/1.4.5/jquery.mobile-1.4.5.min.css" />
      <script src="https://code.jquery.com/jquery-1.11.1.min.js"></script>
      <script src="https://code.jquery.com/mobile/1.4.5/jquery.mobile-1.4.5.min.js"></script>
      <script src="input-emmeshop.js"></script>
      <style type="text/css">
      .label1 { display: inline !important; vertical-align: 1.0em; }
      </style>
</head>
<body>
       <div data-theme="a" data-role="header">
           <p align="center"><img src="https://www.emmeshop.eu/blog/themes/bartik/Logo-Emmeshop.png" alt="Home"></p>
       </div>
          <div class="content-input" >
            <div class="s-title"><center>Home Automation</center></div>
            <ul data-role="listview" data-inset="true" >
              <li>
                      <label for="I00" class="label1"><b>Input 00  </b></label>
                      <select disabled name="I00" id="I00" data-mini="false" data-role="slider">
                        <option value="0">Open</option>
                        <option value="1">Closed</option>
                      </select>
              </li>
              <li>
                      <label for="I01" class="label1"><b>Input 01  </b></label>
                      <select disabled name="I01" id="I01" data-mini="false" data-role="slider">
                        <option value="0">Open</option>
                        <option value="1">Closed</option>
                      </select>
              </li>
              <li>
                      <label for="I02" class="label1"><b>Input 02  </b></label>
                      <select disabled name="I02" id="I02" data-mini="false" data-role="slider">
                        <option value="0">Open</option>
                        <option value="1">Closed</option>
                      </select>
              </li>
              <li>
                      <label for="I03" class="label1"><b>Input 03  </b></label>
                      <select disabled name="I03" id="I03" data-mini="false" data-role="slider">
                        <option value="0">Open</option>
                        <option value="1">Closed</option>
                      </select>
              </li>
              <li>
                      <label for="I04" class="label1"><b>Input 04  </b></label>
                      <select disabled name="I04" id="I04" data-mini="false" data-role="slider">
                        <option value="0">Open</option>
                        <option value="1">Closed</option>
                      </select>
              </li>
              <li>
                      <label for="I05" class="label1"><b>Input 05  </b></label>
                      <select disabled name="I05" id="I05" data-mini="false" data-role="slider">
                        <option value="0">Open</option>
                        <option value="1">Closed</option>
                      </select>
              </li>
              <li>
                      <label for="I06" class="label1"><b>Input 06  </b></label>
                      <select disabled name="I06" id="I06" data-mini="false" data-role="slider">
                        <option value="0">Open</option>
                        <option value="1">Closed</option>
                      </select>
              </li>
              <li>
                      <label for="I07" class="label1"><b>Input 07  </b></label>
                      <select disabled name="I07" id="I07" data-mini="false" data-role="slider">
                        <option value="0">Open</option>
                        <option value="1">Closed</option>
                      </select>
              </li>
            </ul>
          </div>
       <div data-theme="a" data-role="footer">
          <p align="center"><h2>Emmeshop Electronics</h2></p>
       </div>
</body>
</html>
Create a new file input-emmeshop.js
sudo nano /home/pi/domo-emmeshop/input-emmeshop.js
with this content
$(document).ready(function(){
          var jqxhr = $.getJSON('action.php?', function(data) {
              value_update(data);
          })
  });
  function value_update(data) {
      $.each(data, function (index, value) {
              $('#I'+index).val(value).slider("refresh");
      });
  }
Create a new file action.php
sudo nano /home/pi/domo-emmeshop/action.php
with this content
<?php
  $read=shell_exec('sudo python /var/www/input-emmeshop.py');
  if($read=="")
  {
      echo "Error";
  }
  else
  {
      $tempArray=explode("\n",$read);
      // create array with read values
      for ($i = 0; $i<8; $i++)
      {
         $pin = sprintf('%02s', $i);
         $myArray[$pin]=intval(str_replace("\n","",$tempArray[$i]));
      }
      // creato json string
      echo json_encode($myArray);
  }
  ?>
Make a link of domo-emmeshop from /home/pi/domo-emmeshop to /var/www/domo-emmeshop .
sudo ln -s /home/pi/domo-emmeshop /var/www/domo-emmeshop
Finally, create a python file input-emmeshop.py
sudo nano /var/www/input-emmeshop.py
with this content
#!/usr/bin/env python

  #Basic imports
  from ctypes import *
  import sys
  import random
  import os
  #Phidget specific imports
  from Phidgets.PhidgetException import PhidgetErrorCodes, PhidgetException
  from Phidgets.Events.Events import AttachEventArgs, DetachEventArgs, ErrorEventArgs, InputChangeEventArgs, OutputChangeEventArgs, SensorChangeEventArgs
  from Phidgets.Devices.InterfaceKit import InterfaceKit

  arrInState=[0,0,0,0,0,0,0,0]

  #Create an interfacekit object
  try:
      interfaceKit = InterfaceKit()
  except RuntimeError as e:
      print("Runtime Exception: %s" % e.details)
      print("Exiting....")
      exit(1)

  #Event Handler Callback Functions
  def interfaceKitAttached(e):
      attached = e.device

  def interfaceKitDetached(e):
      detached = e.device

  def interfaceKitError(e):
      try:
          source = e.device
          print("InterfaceKit %i: Phidget Error %i: %s" % (source.getSerialNum(), e.eCode, e.description))
      except PhidgetException as e:
          print("Phidget Exception %i: %s" % (e.code, e.details))

  def interfaceKitInputChanged(e):
      source = e.device
      arrInState[int(e.index)]=int(e.state)

  def interfaceKitSensorChanged(e):
      source = e.device

  def interfaceKitOutputChanged(e):
      source = e.device

  #Main Program Code
  try:
      interfaceKit.setOnAttachHandler(interfaceKitAttached)
      interfaceKit.setOnDetachHandler(interfaceKitDetached)
      interfaceKit.setOnErrorhandler(interfaceKitError)
      interfaceKit.setOnInputChangeHandler(interfaceKitInputChanged)
      interfaceKit.setOnOutputChangeHandler(interfaceKitOutputChanged)
      interfaceKit.setOnSensorChangeHandler(interfaceKitSensorChanged)
  except PhidgetException as e:
      print("Phidget Exception %i: %s" % (e.code, e.details))
      print("Exiting....")
      exit(1)

  try:
      interfaceKit.openPhidget()
  except PhidgetException as e:
      print("Phidget Exception %i: %s" % (e.code, e.details))
      print("Exiting....")
      exit(1)

  try:
      interfaceKit.waitForAttach(10000)
  except PhidgetException as e:
      print("Phidget Exception %i: %s" % (e.code, e.details))
      try:
          interfaceKit.closePhidget()
      except PhidgetException as e:
          print("Phidget Exception %i: %s" % (e.code, e.details))
          print("Exiting....")
          exit(1)
      print("Exiting....")
      exit(1)

  try:
      interfaceKit.closePhidget()
  except PhidgetException as e:
      print("Phidget Exception %i: %s" % (e.code, e.details))
      print("Exiting....")
      exit(1)

  for index in range(len(arrInState)):
      print ("%i" % arrInState[index])
  exit(0)
Step 2: How It Work
How it work
The input.html file creates a web page based on HTML, jQuery and AJAX with 8 toggle switch that show digital inputs state.
When the page is loaded asks the status of the digital inputs at 1018 and displays it using the toggle switches
We have used a switch and a key switch, but you can connect magnetic contacts ( to see if doors and windows are closed ) or the Current Status Switch to see if an appliance is turned on ( I turned off the iron !!? )